IVT Corporation
4/F, Fazhan Plaza,
NO. 12, Xinxi Road,
Haidian District,
Beijing, 100085
P.R. China
Tel: +86 10 82898230
Fax: +86 10 62963059
www.ivtcorporation.com
www.bluesoleil.com
1. Overview
This BlueSoleilTM SDK sample application implements a Bluetooth manager which demonstrates a series of standard Bluetooth operations, including local device managing, remote device managing and profile managing. At least two PCs with Bluetooth radio are required to test the sample application.
2. SDK File Components
· The folder “include” located in the BlueSoleil SDK\SDKheaders directory is composed of SDK C++ header files. “Btsdk_API.h” is the header file in which API prototypes are defined. Structures are defined in “Btsdk_Stru.h”. Relevant constants are defined in “Btsdk_Macro”. “Btsdk_ui” is the user interface to the three header files mentioned above.
· The folder “bin” located in the \BlueSoleil SDK directory is composed of correlative binary files. BsSDK.lib is the BlueSoleil API function address library linking with developer’s program. Note: BsSDK.dll is the BlueSoleil APIs implementation, which is installed to Windows system directory when BlueSoleil is installed.
· The folder “Sdksample” located in the \BlueSoleil SDK directory is composed of source files of SDK sample application.
3. Program Running Environment
BlueSoleil 6.4.236.0 or greater is required to be installed before running any programs using the SDK.
Load Bssdk.lib to your project to enable the APIs from Bssdk.dll located in the directory c:\WINDOWS\system32. The “Btsdk_Init” function MUST be called for initializing resources required to run the BlueSoleil before calling any other API functions.
4. Building the Sample Application
1. Open the sdksample.dsp project file located in the \BlueSoleil SDK\SDKsample directory with Microsoft Visual C++ 6.0.
2. Build the application with Win32 Release or Win32 Debug configuration.
3. Execute sdksample.exe.
5. Functional Introduction
5.1 Local Device Manager
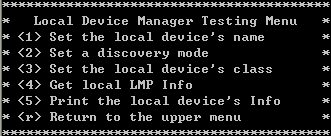
· Set the local device’s name. The length of name should not be more than 64 characters
· Set a discovery mode. The mode can be the binary combination of the listed modes. If GENERAL_DISCOVERABLE and LITMITED_DISCOVERABLE are all included in the choice (for example: the inputting number is 3 or 7), the mode will be set to the former one. If BTSDK_CONNECTABLE and/or BTSDK_PAIRABLE are NOT included in the choice (for example: the inputting number is 1 or 3), the mode will be set to unconnectalbe and/or unpairable. For more information about discovery mode refer to Chapter 5.2.4 “Bluetooth Device Modes” of SDK User Manual.
· Set the local device’s class. Identify the device class of local device. For more information about device class refer to Chapter 5.2.3 “Class of Device/Service Field” of SDK User Manual. In this sample, device class can be set to desktop PC or laptop.
· Get LMP Info. Get LMP (Link Management Protocol) information about local Bluetooth device.
· Print the local device’s Info. Print the device name, device address, device class and discovery mode.
5.2 Remote Device Manager
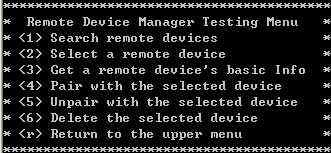
· Search remote devices. Discoverable remote devices will be listed in finding order.
· Select a remote device. Get and record the selected remote device’s handle.
· Get a remote device’s basic Info. Print the device name, device address and device class of selected remote device.
· Pair with the selected device. The default pin code is “1234”.
· Unpair with the selected device. Set the selected paired remote device to unpair mode, i.e. remove the link key and the “Paired” flag of the specified device from historical record.
· Then you can pair local device from remote Bluetooth device. The default pin code is “1234”.
· Delete the selected device. Remove the selected device record from historical record.
Note: The operations listed above should be completed step by step in order because of the continuity in function calling.
5.3 Profile Manager
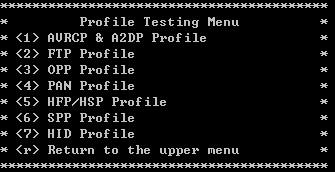
AVRCP & A2DP Profile
This profile test demonstrates the connection operation between local device and remote audio sink. Before connecting with remote audio sink (usually a headset or PC), make sure the remote device and remote service are selected successfully.

1. Select “AVRCP & A2DP Profile” on Profile Testing Menu.
2. Enter “<1> Select A Remote Audio Device”. The devices from historical searching data will be shown. If there is no device available, search for the devi ces once again by following the operation instructions in the program. Then select the expected remote device with audio sink.
3. Enter “<2> Select Service’s Handle” and choose the “Bluetooth Audio Sink” service.
4. Enter “<3> Connect Remote Audio Service” and confirm pin code if needed. Then the physical audio card is switched to Bluetooth AV card automatically by BlueSoleil.
5. A2DP and AVRCP connection is established after the previous step. Now you can play music or some other audio files on local device (audio source), and receive sounds on remote device (audio sink). You can also control the local playing, e.g. pause, stop and/or volume control, by operating remote device.
6. Disconnect from remote service.
Note: The operations listed above should be completed step by step in order because of the continuity in function calling.
FTP Profile
This profile test demonstrates a series of File Transfer Profile operations between local and remote device. Before doing FTP operations, make sure the remote device and remote FTP service are selected correctly.
1. Select “FTP Profile” on Profile Testing Menu. The devices from historical searching data will be displayed. If there is no device available, search for the devices once again by following the operation instructions in the program.
2. Select a remote device with FTP service which you would like to connect with.
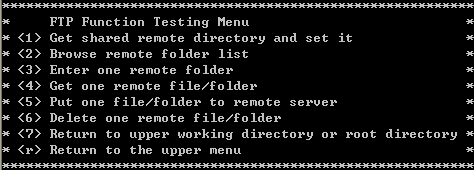
3. Select “Bluetooth File Transfer” on service list. After confirming pin code you will enter FTP Function Testing Menu.
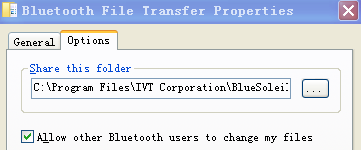
4. For the sake of doing local FTP operations, remote FTP server property is required to be set correctly. Start BlueSoleil in Classic View on remote device. Then access Bluetooth>My Device Properties>Services>Bluetooth File Transfer>Properties>Options. Set the sharing folder directory and check the item “Allow other Bluetooth users to change my files” as the figure shown below.
5. Get shared remote directory and set it. This operation gets remote root directory and sets other working folders. The remote root directory which you have set in the previous step is “\”, shown as a relative path on local device. The new working folders are all created under this root directory.
6. Browse remote folder list. Browse the content of current working folder of remote server.
7. Enter one remote folder. Enter a sub-folder of current working folder and browse the content.
8. Get one remote file/folder. Get a file/folder from current working directory of remote server and then save it to local directory, of which the full path is required to be specified.
9. Put one file/folder to remote server. Put a file/folder to current working directory of remote server. Full path is required when inputting the directory of local file/folder.
10. Delete one remote file/folder. Delete a file/folder from the current working directory of remote server.
11. Return to upper working directory or root directory. Return to upper directory of current working directory of remote server, or directly return to remote root directory “\”.
Note: files/folders with some special characters (e.g. “space”) may not be supported to be transferred in this FTP sample.
OPP Profile
This profile test demonstrates a series of Object Push Profile operations between local and remote device. Before doing OPP operations, make sure the remote device and remote OPP service are selected correctly.
1. Select “OPP Profile” on Profile Testing Menu. The devices from historical searching data will be displayed. If there is no device available, search for the devices once again by following the operation instructions in the program.
2. Select a remote device with OPP service.
3. Select “Bluetooth Object Push” on service list. After confirming pin code you will enter OPP Function Testing Menu.
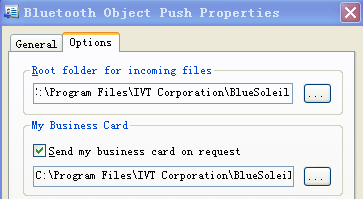
4. For the sake of doing local OPP operations, remote OPP server property is required to be set correctly. Start BlueSoleil in Classic View on remote device. Then access Bluetooth>My Device Properties>Services>Bluetooth Object Push>Properties>Options. Specify the root folder for incoming files and also set a business card (*.vcf) as default outgoing vcf card of remote server, as shown below.
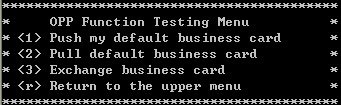
5. Push my default business card. The program will automatically create two directories as follows on local client when executing the card pushing, card pulling or card exchanging operation.
Inbox: C:\Bluetooth\Inbox
Outbox: C:\Bluetooth\Outbox
Manually create a business card file Alvin.vcf in the “Outbox” folder as default outgoing business card. By entering “<1> Push my default business card”, the card file “Alvin.vcf” will be pushed to the folder of remote server, which you have set in the previous step.
6. Pull default business card. Pull the default outgoing card from remote server, which you have set in Step 4, and the card will be save to the Inbox folder of local client.
7. Exchange business card. Exchange the card Alvin.vcf of local client with default outgoing card of remote server. The exchanged cards are respectively saved to the default directories mentioned above.
Note: A business card got from remote server (either pulled or exchanged) is automatically saved as remote.vcf on local device.
PAN Profile
This profile test demonstrates the connection operation between local device and remote PAN server. Before connecting with remote PAN service, make sure the remote device and remote GN service are selected successfully.
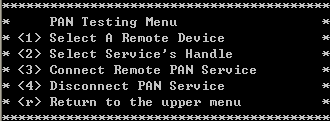
1. Select “PAN Profile” on Profile Testing Menu.
2. Enter “<1> Select A Remote Device”. The devices from historical searching data will be displayed. If there is no device available, search for the devices once again by following the operation instructions in the program. Then select a remote device with PAN service.
3. Enter “<2> Select Service’s Handle” and choose “Bluetooth GN Server”.
4. Enter “<3> Connect Remote PAN Service” and confirm pin code if needed.
5. The PAN connection is established after the previous step. Now you can do some PAN operations between local and remote device, i.e. LAN accessing through remote PC, remote desktop controlling, etc.
6. Disconnect from remote service.
Note: The operations listed above should be completed step by step in order because of the continuity in function calling.
HFP/HSP Profile - Audio Gateway
This profile test demonstrates the connection operation between local audio gateway and remote device (usually a headset device). Before doing HFP/HSP operations, make sure the remote device and remote hands-free or headset service are selected successfully.
1. Select “HFP/HSP Profile” on Profile Testing Menu. Then select “<1> HFP AG service – default service”. The devices from historical searching data will be displayed. If there is no device available, search for the devices once again by following the operation instructions in the program.
2. Select a remote headset device with HFP/HSP service.
3. HFP/HSP connection is established after the previous step. Now you can play music or some other audio files on local device (audio gateway), and receive sounds on remote headset device.
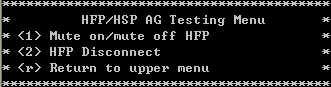
4. Enter “<1> Mute on/mute off HFP” to switch HFP/HSP connection to mute on or mute off state.
5. Disconnect from remote headset device.
HFP/HSP Profile - Device
In this profile test local device class has to be switched to handset device (0x240404), which is needed to connect with remote audio gateway (usually a mobile phone). One mobile phone (Phone A) as audio gateway (AG) and another phone (Phone B) as remote communication terminal are required in this test sample. Before doing HFP/HSP operations, make sure the remote device and remote audio gateway service are selected successfully.
1. Select “HFP/HSP Profile” on Profile Testing Menu. Then select “<2> HFP device service”. The devices from historical searching data will be displayed. If there is no device available, search for the devices once again by following the operation instructions in the program.
2. Select Phone A as remote audio gateway.
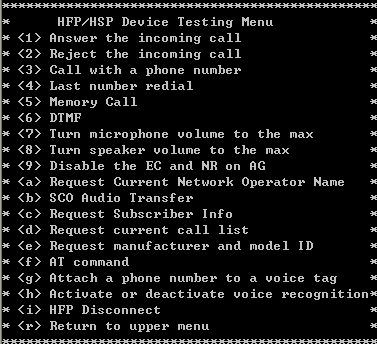
3. Hands-free connection between local device and Phone A is established after the previous step. Dial Phone A’s number from Phone B, then enter “<1> answer the incoming call” to pick up the phone, and voice is received and transmitted from headset of local device.
4. Enter “<2> Reject the incoming call” to ring off.
5. Enter “<3> Call with a phone number”, then input the phone number of Phone B on local device, following the instruction. Wait until Phone B rings and the ring tone is received from local headset, indicating the dialing function is successful.
6. Enter “<4> Last number redial”. Wait until Phone B rings and the ring tone is received from local headset, indicating the last number redialing function is successful.
7. Enter “<5> Memory Call”. Before testing this functionality, a speed dial number has to be pre-set manually on phone A. For example, a phone number “12345678” is assigned to key 2, indicating that the memory location of the number “12345678” is 2.
8. Enter “<6> DTMF”. During an ongoing call, by inputting the DTMF digit, the HF could transmit the AT+VTS command to instruct the AG to transmit a specific DTMF code to its network connection.
9. Enter “<7> Turn microphone volume of cell phone to the Max”. This functionality turns the microphone volume of phone A to the max.
10. Enter “<8> Turn speaker volume of cell phone to the Max”. This functionality turns the speaker volume of phone A to the max.
11. Enter “<9> Disable the EC and NR on AG”. This functionality disables the echo canceling and noise reduction functions resident in the AG if these two functions are supported by the phone A.
12. Enter “<a> Request for Current Network Operator Name”. This functionality gets the current network operator’s name. Note: The operator name will be returned by the BTSDK_HFP_EV_NETWORK_OPERATOR_IND event. For more details please refer to the source code and SDK user guide.
13. Enter “<b> SCO Audio Transfer” to release current SCO link with AG.
14. During an ongoing call, enter “<c> Request for Subscriber Info” to get the subscriber number information. Note: The subscriber number will be returned by the BTSDK_HFP_EV_SUBSCRIBER_NUMBER_IND event. For more details please refer to the source code and SDK user guide.
15. Enter “<d> Request for current call list” to query the list of current calls. Note: Information of each existing call will be returned by a BTSDK_HFP_EV_CURRENT_CALLS_IND event. For more details please refer to the source code and SDK user guide.
16. Enter “<e> Request for manufacturer and model ID” to get the manufacturer ID information of AG.
17. Enter “<f> AT command” to transmit AT command to the AG and then receive the result codes.
18. Enter “<g> Attach a phone number to a voice tag”. Before testing this functionality, make sure that Phone A supports voice dial. The voice tag could be given from the HF device side through this sample.
19. Enter “<h> Activate or deactivate voice recognition”. Before testing this functionality, make sure that Phone A supports voice dial, and a phone number has already been attached to a unique voice tag on the phone. Then the voice tag could be used on the HF device side to make a voice dial.
20. Disconnect from remote audio gateway (Phone A).
Note: In this sample local device class is required to be switched to hands-free device (0x240404), through either local device manager of SDK sample or BlueSoleil configuration.
SPP Profile
This Profile test demonstrates the SPP connection operation between local device and remote device.
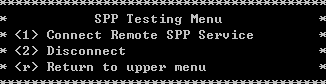
1. Select “SPP Profile” on Profile Testing Menu. Then select “<1> Connect Remote SPP Service”. The devices from historical searching data will be displayed. If there is no device available, search for the devices once again by following the operation instructions. After remote device is selected, choose “SPP Service” from the service list and confirm pin code if needed. Thus an SPP connection is established.
2. Disconnect from remote SPP service.
HID Profile
This Profile test demonstrates the HID connection operation between host and remote hid device.
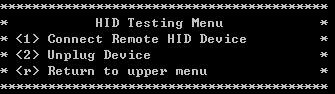
1. Select “HID Profile” on Profile Testing Menu. Then select “<1> Connect Remote HID Device”. The devices from historical searching data will be displayed. If there is no device available, search for the devices once again by following the operation instructions. After remote device is selected, a HID connection is established.
2. Unplug remote HID device.
GATT Profile(Client)
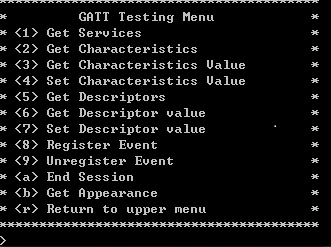
1. Select “GATT profile” on Profile Testing Menu. Then the remote devices will be shown. select the target LE device. If there is no device available, Enter <a> search for the LE device again. Please following steps:
2. Select “<1>Get Services”. Get the LE device’s all services.
3. Select“<2> Get Characteristics”. All the services in the remote device will be shown. Select the correspond service you want to get Characteristics. Then all the Characteristics for this service will be shown.
4. Select“<3> Get Characteristics Value”. The correspond characteristic’s value can be got.
5. Select“<4>Set Characteristics Value”. The correspond characteristic’s value can be set.
6. Select”<5>Get Descriptors”. The correspond characteristic’s descriptor can be shown. This step must be done after “Get Characteristics”.
7. Select”<6>Get Descriptors value”. The correspond descriptor’s value can be got.
8. Select”<7>Set Descriptor value”. The correspond descriptor’s value can be set.
9. Select”<8>Register Event”. The devices characteristics will be shown, select the characteristic which you want to receive the Characteristic Value Change notification.
10. Select”<9>Unregister Event”. Un-register the callback event, then the Characteristic Value Change will not fire to the callback function.
11. Select”<a>End Session”. To disconnect the physical link with the remote device.
12. Select”<b>Get Appearance”. To get the remote device’s device class, only if the remote device supports “Device Information” service.
GATT Profile (Server)
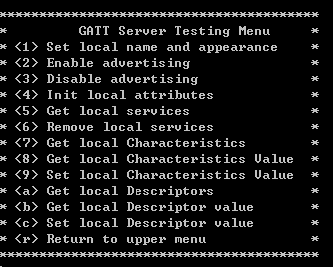
1. Select “GATT Server” on Profile Testing Menu.
2. Select “<1>Set local name and appearance”. To set local device name and appearance. All the information is set in SDKSample’s function by default.
3. Select“<2> Enable advertising”. To set local device to advertising mode, other device which acts as GATT client can find local device by setting their scan enable.
4. Select“<3> Disable advertising”. To disable local device advertising.
5. Select“<4>Init local attribute”. To set local service and characteristics. All the service and characteristic instances are written in SDKSample’s function by default. Currently we add several published profiles by SIG.
6. Select”<5>Get local services”. To show all the service instance initiate by procedure 4.
7. Select”<6> Remove local services”. To remove on local service instance.
8. Select “<7>Get local Characteristics”. To show all the characteristic instance for a specified service.
9. Select “<8> Get local characteristics value”. To get the value of one characteristic instance.
10. Select “<9> Set local characteristics value”. To set the value for one characteristic instance.
11. Select “<a> Get local descriptors”. To show the descriptors one one characteristic instance.
12. Select”<b> Get local descriptor value”. To get the value of one descriptor instance.
13. Select “<c> Set local descriptor value”. To set the value for one descriptor instance.

